Omarsoft For IT Solutions (Java Codes ,C#.NET Codes , ASP.NET Codes ,VB.NET Codes ,Oracle Database Administration, Real Application Cluster , Remote Support, Cloud Services , Networks ,Virtualization....
  • الأنظــمــة المكتبية        Windows App Programming
  • أنظــمـةالويــب        Web based systems programming
  • تطبيقات الهواتف الذكية     smartphones programming
  • إدارة قواعــــــد البيــــــــــــــــانات        Database Administration
  • إدارة الشبكـــــــــــــــــــــــــــــــــات        Networks Administration
  • إدارة الســـيــرفرات (ويب - محلية)  Servers Administration
  • إدارة مخـــــــــــــــــازن البيــــــــــــانات     Storage Administration
  •             N Computing & 2X Application services

    Social Icons

Loading...

Oracle Enterprise Manager OEM in LINUX (Video)1


Oracle Enterprise Manager OEM  in LINUX
 OEM Configuration and Installation in details


SQL Server Database Backup and Restore in C# .NET


Before coding, you must set the reference to the SMO assembly. You need to add these components:
  1. Microsoft.SqlServer.Smo
  2. Microsoft.SqlServer.SmoExtended
  3. Microsoft.SqlServer.ConnectionInfo
  4. Microsoft.SqlServer.Management.Sdk.Sfc
After Adding References, you need to add 2 using statements:
using Microsoft.SqlServer.Management.Smo;
using Microsoft.SqlServer.Management.Common;

The Code

The following code creates connection with SQL Server. To execute:
"select * from sys.databases"
The above query retrieves all databases from SQL Server.
public void Createconnection()
{
DBbackup.DataBaseClass dbc = new DataBaseClass();
cbdatabasename.Items.Clear();
// select * from sys.databases getting all database name from sql server
cmd = new OdbcCommand("select * from sys.databases", dbc.openconn());
dr = cmd.ExecuteReader();
while (dr.Read())
{
cbdatabasename.Items.Add(dr[0].ToString());
}
dr.Close();
}
The following code gets server names that exist. To execute:
"select *  from sys.servers"
The above query retrieves servers:
public void serverName()
{
DBbackup.DataBaseClass dbc = new DataBaseClass();
// select * from sys.servers getting server names that exist
cmd = new OdbcCommand("select * from sys.servers", dbc.openconn());
dr = cmd.ExecuteReader();
while (dr.Read())
{
cbservername.Items.Add(dr[1].ToString());
}
dr.Close();
}

Database Backup

public void backup(string str)
{
if (string.IsNullOrEmpty(cbservername.Text) | string.IsNullOrEmpty(cbdatabasename.Text))
{
MessageBox.Show("Server Name & Database can not be Blank");
return;
}
else
{
if (str == "backup")
{
saveFileDialog1.Filter = "Text files (*.bak)|*.bak|All files (*.*)|*.*";
if (saveFileDialog1.ShowDialog() == DialogResult.OK)
{
// the below query get backup of database you specified in combobox
query("Backup database " + cbdatabasename.Text +
" to disk='" + saveFileDiaog1.FileName + "'");
MessageBox.Show("Database BackUp has been created successfully.");
}
}
}
}

Database Restore

public void Restore(OdbcConnection sqlcon, string DatabaseFullPath, string backUpPath)
{
using (sqlcon)
{
string UseMaster = "USE master";
OdbcCommand UseMasterCommand = new OdbcCommand(UseMaster, sqlcon);
UseMasterCommand.ExecuteNonQuery();
// The below query will rollback any transaction which is running on database
string Alter1 = @"ALTER DATABASE
[" + DatabaseFullPath + "] SET Single_User WITH Rollback Immediate";
OdbcCommand Alter1Cmd = new OdbcCommand(Alter1, sqlcon);
Alter1Cmd.ExecuteNonQuery();
// The below query will restore database file from disk where backup was //taken ....
string Restore = @"RESTORE DATABASE
[" + DatabaseFullPath + "] FROM DISK = N'" +
backUpPath + @"' WITH FILE = 1, NOUNLOAD, STATS = 10";
OdbcCommand RestoreCmd = new OdbcCommand(Restore, sqlcon);
RestoreCmd.ExecuteNonQuery();
// the below query change the database back to multiuser
string Alter2 = @"ALTER DATABASE
[" + DatabaseFullPath + "] SET Multi_User";
OdbcCommand Alter2Cmd = new OdbcCommand(Alter2, sqlcon);
Alter2Cmd.ExecuteNonQuery();
Cursor.Current = Cursors.Default;
}
}

Using of Code:

create new project (C#) :

  1. --- In Designer Mode:

Add new form --> add 2 Combobox  (cbservername , cbdatabasename).
Add 2 buttons (backupbtn , restorebtn) 

     2.--- In the Code Behind of form :

- in form_load event:
 private void Form1_Load(object sender, EventArgs e)
        {
                       
            serverName();
        }

- in cbservername_SelectedIndexChanged event write:
private void cbservername_SelectedIndexChanged(object sender, EventArgs e)
        {
            Createconnection();
        }
       
- in backupbtn_click event:
 private void backupbtn_Click(object sender, EventArgs e)
        {
            backup("backup");
        }
- in restorebtn_click event:
private void restorebtn_Click(object sender, EventArgs e)
        {
            if (string.IsNullOrEmpty(cbservername.Text) | string.IsNullOrEmpty(cbdatabasename.Text))
            {
                MessageBox.Show("Server Name & Database can not be Blank", "Warning!", MessageBoxButtons.OK, MessageBoxIcon.Warning);
                return;
            }
            if (openFileDialog1.ShowDialog() == DialogResult.OK)
            {

                openFileDialog1.Filter = "Text files (*.bak)|*.bak|All files (*.*)|*.*";

                DBbackup.DataBaseClass dbc = new DataBaseClass();
                Restore(dbc.openconn(), cbdatabasename.SelectedItem.ToString(), openFileDialog1.FileName);
               MessageBox.Show("Database Backup file has been restore successfully", "Information", MessageBoxButtons.OK, MessageBoxIcon.Information);

            }
        }

Difference between LINQ to SQL and Entity Framework


LINQ to SQL allow you to query and modify SQL Server database by using LINQ syntax. Entity framework is a great ORM shipped by Microsoft which allow you to query and modify RDBMS like SQL Server, Oracle, DB2 and MySQL etc. by using LINQ syntax. Today, EF is widely used by each and every .NET application to query to database. The difference between LINQ to SQL and EF is given below.

LINQ to SQL
Entity Framework
It only works with SQL Server Database.
It can works with various databases like Oracle, DB2, MYSQL, SQL Server etc.
It generates a .dbml to maintain the relation
It generates an .edmx files initially. The relation is maintained using 3 different files .csdl, .msl and .ssdl
It has not support for complex type.
It has support for complex type.
It cannot generate database from model.
It can generate database from model.
It allows only one to one mapping between the entity classes and the relational tables /views.
It allows one-to-one, one-to-many & many-to-many mappings between the Entity classes and the relational tables /views
It allows you to query data using DataContext.
It allows you to query data using EntitySQL, ObjectContext, DbContext.
It provides a tightly coupled approach.
It provides a loosely coupled approach. Since its code first approach allow you to use Dependency Injection pattern which make it loosely coupled .
It can be used for rapid application development only with SQL Server.
It can be used for rapid application development with RDBMS like SQL Server, Oracle, DB2 and MySQL etc.

Oracle 12C New Features

 The Oracle 12C means different things to different people. It all depends on which areas you are looking at, as there are improvements in many areas. Summarized below is the list of Top 12 Features of Oracle 12C as I see it. I have summarized below, the top 12 which I found interesting.


01. Pluggable Databases Through Database Consolidation:

Oracle is doing every thing to jump into the cloud bandwagon. With 12C, Oracle is trying to address the problem of Multitenancy through this feature. There is a radical change and a major change in the core database architecture through the introduction of Container Databases also called CBD and Pluggable Databases (PDB). The memory and process is owned by the Container Database. The container holds the metadata where the PDBs hold the user data. You can create upto 253 PDBs including the seed PDB.
In a large setup, it is common to see 20 or 30 different instances running in production environment. With these many instances, it is a maintenance nightmare as all these instances have to be separately
•Upgraded
•Patched
•Monitored
•Tuned
•RAC Enabled
•Adjusted
•Backed up and 
•Data Guarded.

With Pluggable Databases feature, you just have to do all this for ONE single instance. Without this feature, prior to 12C, you would have to create separate schemas and there is always a thread of security how much ever the isolation we build into it. There are problems with namespace conflicts, there is always going to be one public synonym that you can create. With PDBs you can have a separate HR or Scott schema for each PDB, separate Emp, Dept Tables and separate public synonyms. Additionally, 2 PDBs can talk to each other through the regular DB Link feature. There is no high startup cost of creating a database any more. Instead of one instance per day, the shift is into one instance per many databases. For the developer community, you can be oblivious of all this and still continue to use the PDBs as if it were a traditional database, but for the DBAs the world would look like it has changed a lot.
Another cool feature is, you can allocate a CPU percentage for each PDB.
Another initiative being, it has announced a strategic tieup with salesforce.com during the first week of July 2013.

02. Redaction Policy:

This is one of the top features in Oracle 12C. Data Redaction in simple terms means, masking of data. You can setup a Data Redaction policy, for example SSN field in a Employee table can be masked. This is called redaction. From Sql Develop you can do this by going to the table: Employee->Right click on Security Policy->click on New->click on Redaction Policy->Enter SSN. 
When you do a select * from employee, it will show that the SSN is masked.
The new data masking will use a package called DBMS_REDACT. It is the extension to the FGAC and VPD present in earlier versions.
By doing this, whoever needs to view the data will be able to see it where as the other users will not be able to view it.

03. Top N Query and Fetch and offset Replacement to Rownum:

With the release of Oracle Database 12c, Oracle has introduced this new SQL syntax to simplify fetching the first few rows. The new sql syntax "Fetch First X Rows only" can be used.

04. Adaptive Query Optimization and Online Stats Gathering:

With this feature, it helps the optimizer to make runtime adjustments to execution plan which leads to better stats. For statements like CTAS (Create Table As Select) and IAS (Insert As Select), the stats is gathered online so that it is available immediately.

05. Restore a Table easily through RMAN:

Earlier if you had to restore a particular table, you had to do all sorts of things like restoring a tablespace and or do Export and Import. The new restore command in RMAN simplifies this task.

06. Size Limit on Varchar2, NVarchar2, Raw Data Types increased:

The previous limit on these data types was 4K. In 12C, it has been increased to 32,767 bytes. Upto 4K, the data is stored inline. I am sure everyone will be happy with this small and cute enhancement.

07. Inline PL/SQL Functions and Procedures:

The in line feature is extended in Oracle 12C. In addition to Views, we can now have PL/SQL Procedures and Functions as in line constructs. The query can be written as if it is calling a real stored procedure, but however the functions do not actually exist in the database. You will not be able to find them in ALL_OBJECTS. I think this will be a very good feature for the developers to explore as there is no code that needs to be compiled.

08. Generated as Identity/Sequence Replacement:

You can now create a col with 'generated as identity' clause. Thats it. Doing this is equivalent to creating a separate sequence and doing a sequence.nextval for each row. This is another handy and a neat feature which will help developer community. This is also called No Sequence Auto Increment Primary Key.

09. Multiple Indexes on a Single Column:

Prior to 12C, a column cant be in more than one index. In 12C, you can include a column in B-tree index as well as a Bit Map index. But, please note that only one index is usable at a given time.

10. Online Migration of Table Partition or Sub Partition:

You can very easily migrate a partition or sub partition from one tablespace to another. Similar to how the online migration was achieved for a non-partitioned table in prior releases, a table partition or sub partition can be moved to another tablespace online or offline. When an ONLINE clause is specified, all DML operations can be performed without any interruption on the partition|sub-partition which is involved in the procedure. In contrast, no DML operations are allowed if the partition|sub-partition is moved offline.

11. Temporary UNDO:

Prior to 12C, undo records generated by TEMP Tablespace is stored in the undo tablespace. With Temp undo feature in 12C, temp undo records can be stored in temporary table instead of UNDO TS. The benefit is - reduced undo tablespace and reduced redo log space used.
SQL> ALTER SYSTEM SET PGA_AGGREGATE_LIMIT=2G;
SQL> ALTER SYSTEM SET PGA_AGGREGATE_LIMIT=0; --disables the hard limit

12. In Database Archiving:

This feature enables archiving rows within a table by marking them as inactive. These inactive rows are in the database and can be optimized using compression but are not visible to the application. These records are skipped during FTS (Full Table Scan).

Other Features:

Advanced Replication and Streams are Dead. It is being replaced with Oracle Golden Gate.
Invisible Columns. You can now have a invisible column in a table. When a column is defined as invisible, the column won’t appear in generic queries
PGA Aggregate Limit setting:
In 12c, you can set a hard limit on PGA by enabling the automatic PGA management, which requires PGA_AGGREGATE_LIMIT parameter settings. Therefore, you can now set the hard limit on PGA by setting the new parameter to avoid excessive PGA usage.
DDL Logging:
The DDL statements will automatically get recorded in xml/log file if ENABLE_DDL_LOGGING is set to True. ALTER SYSTEM|SESSION SET ENABLE_DDL_LOGGING=TRUE


An Introduction to Entity Framework for Beginners


Introduction

This article introduces Entity Framework to absolute beginners. The article is meant for developers who are primarily using ADO.NET to write their data access layers. Many experienced developers will find this article very basic but since the article is written from the perspective of beginners, I've tried to keep things simple.

Background

ADO.NET is a very strong framework for data access. ADO.NET has been around since many years and there are a lot of systems running over ADO.NET. Developers who are totally oblivious to the concept of ORMs will probably be asking "What is Entity Framework? What are the benefits of using it and is it an alternative to ADO.NET?"
Well, to answer the first question about what is Entity Framework, Entity Framework is an Object Relational Mapper (ORM). It basically generates business objects and entities according to the database tables and provides the mechanism for:
  1. Performing basic CRUD (Create, Read, Update, Delete) operations.
  1. Easily managing "1 to 1", "1 to many", and "many to many" relationships.
  1. Ability to have inheritance relationships between entities.
and to answer the second question, the benefits are:
  1. We can have all data access logic written in higher level languages.
  1. The conceptual model can be represented in a better way by using relationships among entities.
  1. The underlying data store can be replaced without much overhead since all data access logic is present at a higher level.
and finally, the last question that whether it is an alternative to ADO.NET, the answer would be "yes and no". Yes because the developer will not be writing ADO.NET methods and classes for performing data operations and no because this model is actually written on top of ADO.NET, meaning under this framework, we are still using ADO.NET. So let us look at the architecture of Entity Framework (diagram taken from MSDN):
Entity framework article image

Using the code

Let's try to understand the ease of use that Entity Framework provides by performing simple CRUD operations. Once we look at the code and how effortlessly and efficiently we can do these operations, the benefits of Entity Framework will become quite obvious.
Creating the database
Let's have a simple database with one table. Let's create a simple table for Contacts and we will perform CRUD operations on this table.
Entity framework article image
Adding the Entity Model to the Website
Once we have the database ready, we can add the entity model to our website. We can do this by adding anADO.NET Entity Data Model to the website.
Entity framework article image
Once we select to add this data model to our website, we will have to select the approach we want to take for our Model's contents.
Entity framework article image
What this selection means is that we can either choose to generate the entity model from an existing database schema or we can design the entity model here and then later hook it up to the database. Since we already have the database ready, we will use the first option. Once the Model is generated, the Entity for each table is generated. The generated entity for our contact table is:
Entity framework article image
Also, the classes for performing database operations are also created. We just need to know how to use these classes to perform database operations.
Entity framework article image
Insert operation
Let us create a simple page to perform an insert operation.
Entity framework article image
Now once the user chooses to insert the values into the database, the actual data operation can be performed by using the 
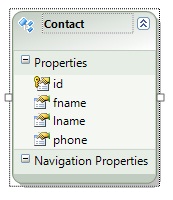
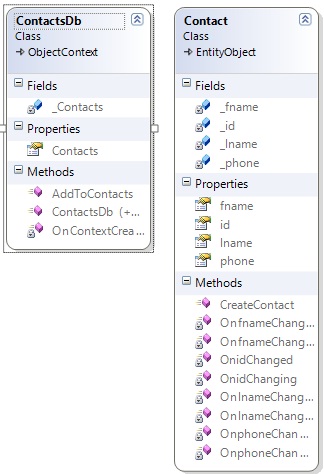
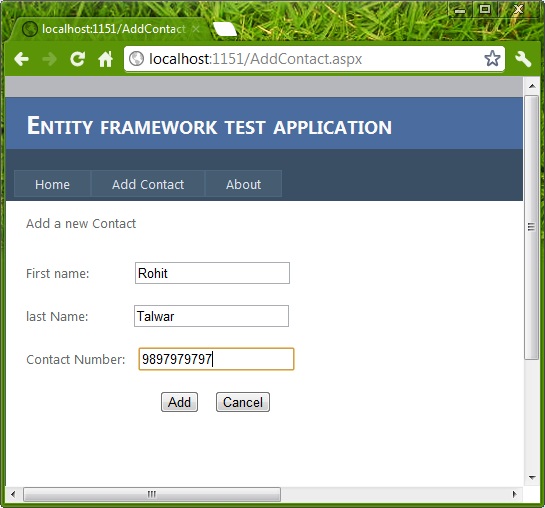
AddObject method of the Model class entity collection. The following code snippet show how to perform the insert.

Contact con = new Contact();
con.fname = TextBox1.Text;
con.lname = TextBox2.Text;
con.phone = TextBox3.Text;
ContactsDb db = new ContactsDb();
db.Contacts.AddObject(con);
db.SaveChanges();
This will insert the record into the table. You can notice the simplicity and efficiency of the code we wrote to perform the insertion.
Reading all the records
There are scenarios when we want to read all records. Let's say we are making a page that will display all the contact information in a single page.
Entity framework article image
We can retrieve the collection of Entities using the Model object to achieve this. The code snippet below will show how that can be done.

ContactsDb db = new ContactsDb();
Repeater1.DataSource = db.Contacts;
Repeater1.DataBind();
Selecting a specific record
If we want to select a specific record from the table, we can use the 
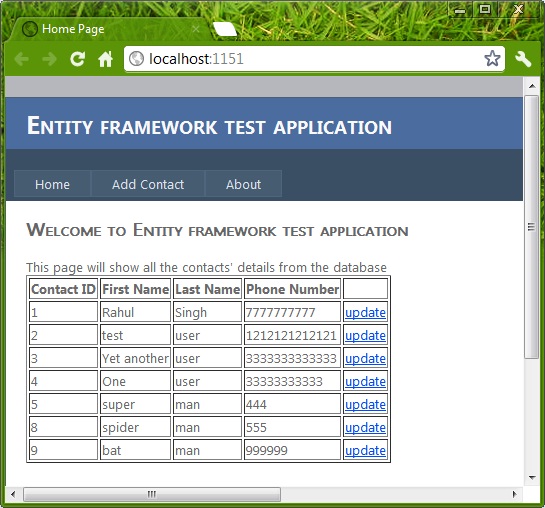
SingleOrDefault method on the Model's entities collection. Let's say we want the functionality of updating/deleting a record on a single page then we will first have to select the record based on the ID, then update/delete the selected record.
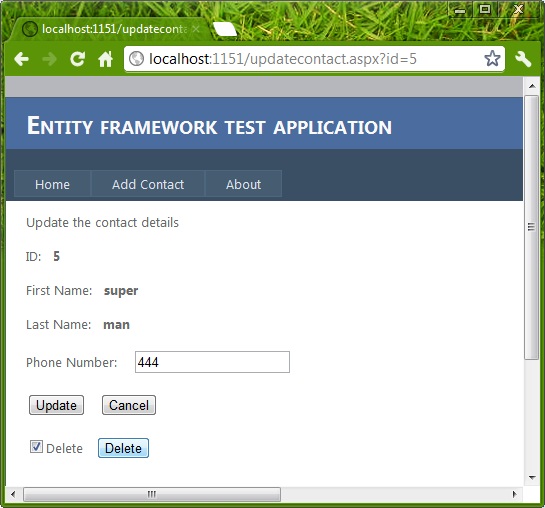
Entity framework article image
Selection of any particular record (Contact) based on ID can be done as:

int idToupdate = Convert.ToInt32(Request.QueryString["id"].ToString());
ContactsDb db = new ContactsDb();
Contact con = db.Contacts.SingleOrDefault(p => p.id == idToupdate);
Once this code is executed, the Contact object will contain the required values.
Updating the record
If we want to update a record, then a simple update operation can be performed as:

int idToupdate = Convert.ToInt32(Request.QueryString["id"].ToString());
ContactsDb db = new ContactsDb();
Contact con = db.Contacts.SingleOrDefault(p => p.id == idToupdate); con.phone = TextBox1.Text;
db.SaveChanges();
Once this code executes, the value of phone number will be updated by a new value which is retrieved fromTextBox1.
Deleting a record
If we want to delete a particular record then we can perform a delete operation by using the DeleteObjectfunction. The following code snippet demonstrates the same:

//delete this contact
int idToupdate = Convert.ToInt32(Request.QueryString["id"].ToString());
ContactsDb db = new ContactsDb();
Contact con = db.Contacts.SingleOrDefault(p => p.id == idToupdate); 

db.Contacts.DeleteObject(con);
db.SaveChanges();


Now that we have the basic CRUD operations performed on the database using the Entity Framework.
A note on Relationships and Lazy Loading
To understand the Entity Framework we need to understand some things like naming conventions, relationships between tables, and relationships between entities. Also, the concept of lazy loading once fully understood will give the power to the developer to use the Entity Framework efficiently.
Note: Since this is an introductory article on Entity Framework we have not discussed these things. Perhaps we will discuss them in a separate article.
Entity Framework has been in use for some time now. But there are many developers who are still getting started with Entity Framework. This article was meant as an overview of the Entity Framework. This should not be treated as a complete tutorial. Also, the code written is very simple and there is a lot of scope for optimization but since the idea here is to understand Entity Framework, I tried to keep the code simple and readable rather and optimal.

Installing Oracle Database and Creating a Database(Linux) OS


  1. Log on to your computer as a member of the administrative group that is authorized to install Oracle Database software and to create and run the database.
    Refer to your operating system-specific documentation or contact your system administrator to determine whether you have the necessary privileges and permissions to install new software.
  2. Do one of the following:
    • If you are installing from distribution media, then insert the distribution media for the database into your computer.
      The Autorun feature opens the Select a Product to Install window automatically.
    • If you downloaded the installation software from the Oracle Web site, then follow the instructions on the site to run the Oracle Universal Installer. Or, see the Oracle Database Installation Guide for your platform.
  3. The first window that appears is the Configure Security Updates window. To receive notifications about security issues via e-mail, enter your e-mail address in the Email text field. To receive security updates from My Oracle Support, enter the e-mail address registered with My Oracle Support, select the I wish to receive security updates... option, and enter your My Oracle Support password.
    Click Next to continue.
    The Select Installation Option window appears.
  4. Choose the Create and configure a database option. Or, you also have the option of choosing to only install the database software, but then you must create a database in an additional step after the software is installed. If you are currently using a previous version of Oracle Database, choose Upgrade an existing database. After you have chosen an option, click Next.
    The System Class window appears.
  5. Choose Desktop Class.
    You can choose the Server Class option to customize your installation. For example, you use this method to configure Oracle Automatic Storage Management for your database, install the Sample Schemas, or configure automated backups. Selecting this option guides you through a series of installation steps that are not documented in this guide. For more information about the advanced choices, see "About Advanced Installation". Also see Oracle Database Installation Guide for your platform.
    Click Next.
    The Typical Install Configuration window appears.
    Description of install_basic.gif follows

  6. Provide the following configuration details for the database:
    • Oracle Base Location— The Oracle base directory helps to facilitate the organization of multiple Oracle software installations. See the Oracle Database Installation Guide for your platform for more information about ORACLE_BASE.
      If you did not set the ORACLE_BASE environment variable before starting OUI, then the Oracle base directory is created in anapp/username/directory on the first existing and writable directory from /u01 through /u09 for UNIX and Linux systems, or on the disk drive with the most available space for Windows systems. If /u01 through /u09 does not exist on the UNIX or Linux system, then the default location is user_home_directory/app/username.
      You can click Browse to find the directory you want to act as the Oracle base directory.
    • Software Location—The software location is the Oracle home for your database. You must specify a new Oracle home directory for each new installation of Oracle Database software. By default, the Oracle home directory is a subdirectory of the Oracle base directory.
      You can click Browse to find the directory where you want to install the Oracle Database software.
    • Database File Location—The database file location is the location where Oracle Database files are stored. By default, this location is Oracle_base/oradata. You can click Browse to select a different location.
    • Database Edition—Select either Enterprise EditionStandard EditionStandard Edition One, or Personal Edition (Microsoft Windows platforms only). See "Installation Type".
    • Character Set—Choose the character set to use to store the data within the database. You can choose between the Default, which is based on the operating system language settings, or Unicode.
    • OSDBA Group (Linux and UNIX platforms only)—Specify the operating system DBA group. Host computer users in this group have administrative privileges on the database. This group is typically named dba. Refer to Oracle Database Installation Guide for Linuxor for your UNIX platform for more details.
    • Global Database Name—Enter the fully qualified global database name. See "Installation Type" for more on global database name.
    • Administrative Password—Specify the initial password for the SYSSYSTEMSYSMAN, and DBSNMP administrator accounts. If the password you choose is not a secure password, a warning message will be displayed.
    After you enter the required information, click Next.
    If Oracle software has not previously been installed on this server, then the Create Inventory window appears. If this is not the first installation attempt on this server, then the Perform Prerequisite Checks window appears.
  7. For first time installations on Linux and UNIX operating systems only, specify a directory for installation files and the name of an operating system group that has write permissions for that directory.
    If this is the first time you are installing any Oracle software on this computer, then the Create Inventory Directory window appears. You must specify a local directory for the inventory, which OUI uses to keep track of all Oracle software installed on the computer. This information is used while applying patches or upgrading an existing installation, and while deinstalling Oracle software. Note that this directory is different from the Oracle home directory. The recommended value for the inventory directory isOracle_base/../oraInventory, or one level above the Oracle base directory, in the oraInventory subdirectory. If your Oracle base directory is /u01/app/oracle, then the Oracle inventory directory defaults to /u01/app/oraInventory.
    In this window you can also specify the operating system group that has write permissions on the inventory directory. This prevents other users from writing over the Oracle product installation files. Typically the oinstall group is selected.
    After you enter a directory path and optionally specify an operating system group, click Next to continue.
    The Perform Prerequisite Checks window appears.
  8. If any checks failed, then take corrective actions.
    OUI performs several environment checks and indicates whether the check was a success, or resulted in a warning or failure. Details of the checks are provided in the displayed window. The installation can proceed only when all checks have a status of either Succeeded or Warning. If any of the environment checks failed, then they must be resolved manually. See "Checking Prerequisites" for more information.
    If all the prerequisite checks passed, or after you click Next, the Summary window appears,
  9. Review the installation summary, then click Finish to start the installation.
    The Install window appears, showing the installation progress. After the installation phase, the Configuration Assistants window appears. This window lists the configuration assistants that are started automatically. If you chose to create a starter database, then Database Configuration Assistant starts automatically in a separate window.
    After database creation, a window is displayed that summarizes the database creation.
  10. (Optional) Click Password Management to unlock user accounts to make the accounts accessible to users.
    The SYS and SYSTEM accounts are unlocked by default.
  11. Click OK to continue the installation.
  12. For Linux and UNIX operating systems only, run the specified scripts, then click OK.
    In the Execute Configuration Scripts window, you are prompted to open a new terminal window, and to run scripts as the root user. After you run the scripts, return to this window and click OK.
  13. Make note of the information in the Finish window, then click Close to exit OUI.
    Your installation and database creation is now complete. The Finish window displays one or more important URLs, including one for the Oracle Enterprise Manager Database Control console. (The console is the user interface—the Web application—portion of Oracle Enterprise Manager Database Control.)
    You use Oracle Enterprise Manager Database Control to perform common database administration tasks. The URL and port information for Database Control can be found after installation in the Oracle_home/install/portlist.ini file.


Sana'a Yemen - 50th st.

+967 738166685

omar.soft2000@gmail.com

للاتصال بنا CONTACT US

الاسم Name

بريد إلكتروني Email *

رسالة Message *

2015-2023 © All Rights Reserved Omarsoft
Back To Top